As the holiday season approaches, there’s a certain magic that fills the air, bringing back memories of laughter, warmth, and the delightful aroma of freshly baked cookies. Just the other day, I found myself daydreaming in the kitchen, reminiscing about those joyful childhood moments spent with family, decorating our own special treats. That’s when I decided to whip up a batch of Santa’s Cookies—an irresistible blend of buttery goodness, festive M&M’s, and a touch of chocolatey delight.
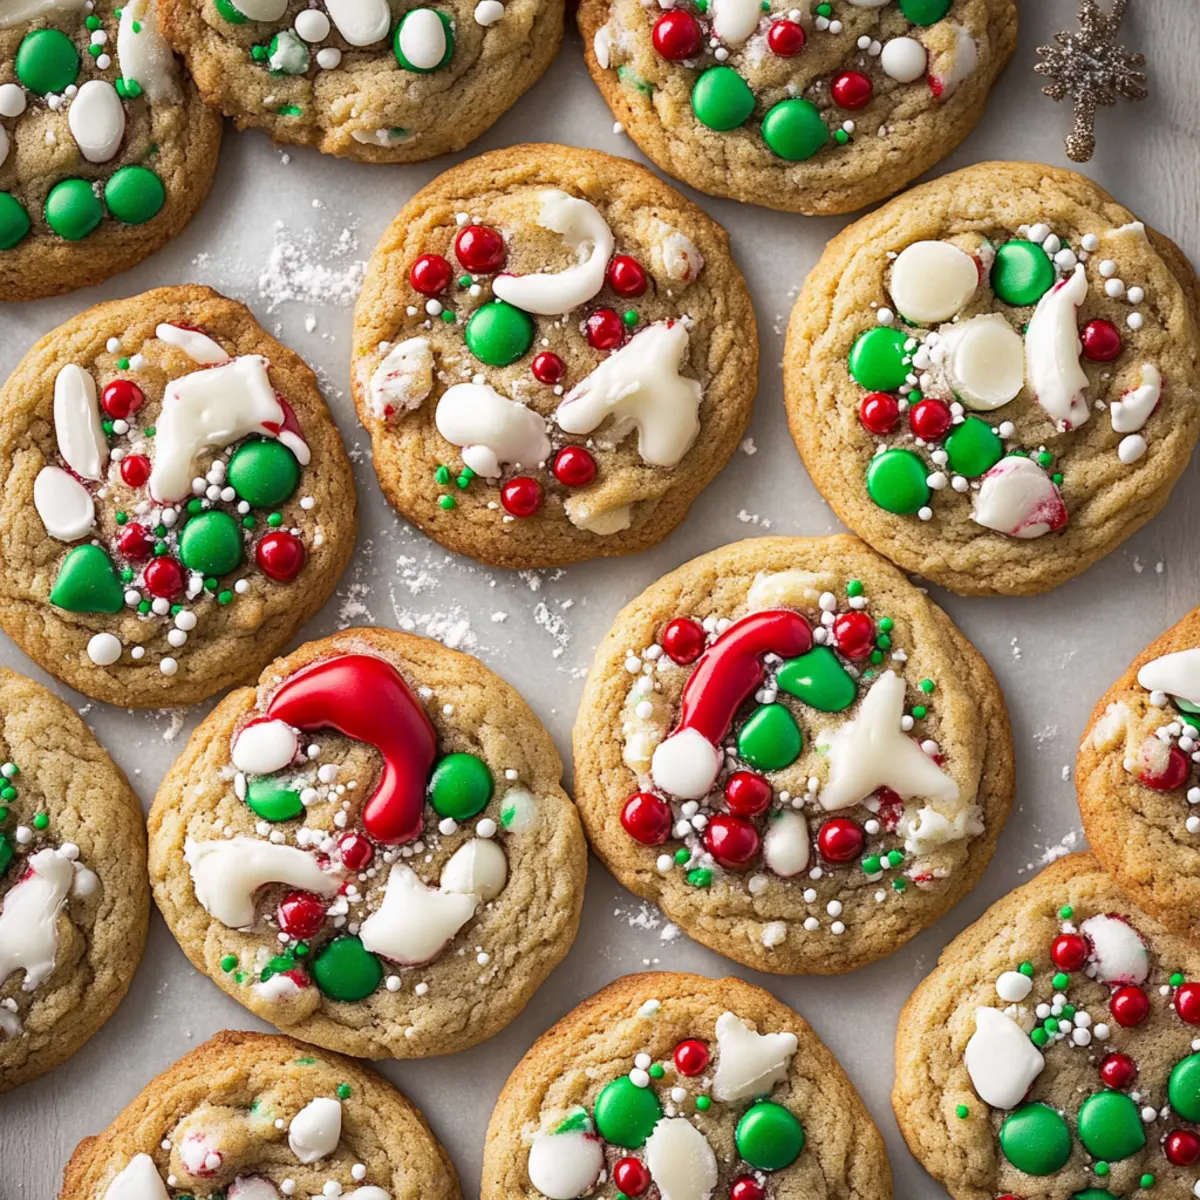
These cookies are not just a craving-satisfying dessert; they’re a celebration of the season. With their vibrant colors and heartwarming flavors, they bring smiles to both young and old alike. What’s even better? They’re incredibly simple to make, ready in just under 30 minutes. Whether you’re preparing for a holiday gathering or simply indulging in a sweet treat after a long day, this recipe promises to be a delightful addition to your cookie repertoire. So, let’s dive into this festive baking adventure and create some delicious memories together!
Why You'll Love This Santa’s Cookies
- These Santa’s Cookies are incredibly easy to make, allowing you to whip up a batch in just under 30 minutes.
- The combination of semi-sweet and white chocolate chips, along with festive M&M’s, creates an irresistible flavor that will have everyone coming back for more.
- With their colorful appearance, these cookies add a cheerful touch to any holiday gathering, delighting both kids and adults alike.
- Plus, they are perfect for sharing, making them a crowd-pleaser at parties and festive events.
Santa’s Cookies Ingredients
• Get ready to bake something magical!
For the Cookie Dough
- Unsalted butter – soften it to ensure a creamy texture that blends well with the sugars.
- Light brown sugar – adds a rich, caramel-like flavor that pairs perfectly with festive treats.
- Granulated sugar – balances the molasses notes of brown sugar for a delightful sweetness.
- Vanilla extract – brings warmth and depth, enhancing the overall flavor of the cookies.
- Large eggs – help bind the ingredients together and add moisture to the dough.
- All-purpose flour – provides the structure needed for these Santa’s Cookies to hold their shape.
- Kosher salt – a pinch elevates the sweetness and balances the flavor beautifully.
- Baking soda – ensures the cookies rise and achieve that perfect chewy texture.
For the Add-ins
- Semi-sweet chocolate chips – these create a rich chocolatey burst that every bite craves.
- White chocolate chips – add a creamy contrast to the darker chocolate flavors.
- Holiday M&M’s candy – their festive colors bring joy and a bit of crunch to each cookie.
- Holiday jimmies – sprinkle these on top for an extra festive touch that’s sure to delight!

How to Make Santa’s Cookies
-
Preheat your oven to 350°F. Line cookie sheets with parchment paper to prevent sticking and make cleanup easy. This simple step ensures your cookies bake evenly and have a nice crisp edge.
-
Combine the softened butter and light and granulated sugars in a large mixing bowl. Beat for about 2 minutes, until the mixture is creamy and well-blended, allowing the sugars to dissolve into the butter.
-
Add the eggs and vanilla extract to your sugar-butter mixture. Beat until everything is well mixed, creating a rich, smooth base for your cookies.
-
Incorporate the all-purpose flour, kosher salt, and baking soda into the mixture. Mix JUST until combined to avoid overworking the dough—the less, the better for a perfect chewy texture!
-
Fold in the semi-sweet chocolate chips, white chocolate chips, holiday M&M’s, and jimmies. This is where the fun begins—each fold brings in colorful and delicious surprises.
-
Scoop the dough using a 2 Tablespoon cookie scoop onto the prepared baking sheets. Keep the cookies about 2 inches apart to allow them to spread while baking.
-
Bake for 11-13 minutes, until the edges are lightly browned but the centers remain soft and slightly underdone. This will give your cookies the perfect chewy bite!
-
Cool the cookies on the baking sheet for a few minutes, then transfer them to a wire rack to cool completely. This ensures they set nicely and develop the right texture.
Optional: Drizzle melted chocolate over the cooled cookies for an extra indulgent touch!
Exact quantities are listed in the recipe card below.
What to Serve with Santa’s Cookies?
As the cozy scents of these festive cookies waft through your home, envision the delightful spread that could accompany them.
-
Warm Milk: A comforting classic, warm milk pairs beautifully with cookies, enhancing their sweetness and providing a nostalgic touch.
-
Hot Cocoa: Rich and creamy hot cocoa brings indulgence to your cookie experience, creating a warm embrace for those sweet bites.
-
Vanilla Ice Cream: A scoop of creamy vanilla ice cream alongside Santa’s Cookies lends a delicious contrast, making each bite a creamy delight.
-
Peppermint Bark: Adding layers of flavor, the cool crunch of peppermint bark alongside your cookies creates a joyous holiday harmony.
-
Fruit Platter: Bright, fresh fruits like strawberries and oranges balance the sweetness of the cookies, adding a refreshing bite to your dessert spread.
-
Nutty Biscotti: The crunchy texture of homemade or store-bought biscotti provides a delightful contrast to the chewy Santa’s Cookies, wonderfully complementing their festive flavors.
-
Spiced Apple Cider: Warm spiced apple cider offers a seasonal drink that pairs beautifully with cookies, enhancing the cozy winter vibes.
-
Holiday Punch: A colorful holiday punch served in a festive pitcher can elevate your cookie experience, creating a cheerful atmosphere for gatherings.
-
Chocolate Dipped Pretzels: Combining salty and sweet, these treats provide a satisfying crunch, making them an irresistible addition to your cookie platter.
Santa’s Cookies Variations
Feel free to get creative! These delicious cookies are the perfect canvas for your personal touch.
-
Gluten-Free: Substitute all-purpose flour with a 1:1 gluten-free blend for a lighter option that everyone can enjoy.
-
Nutty Twist: Add 1 cup of chopped walnuts or pecans for a delightful crunch and nutty flavor that complements the chocolate beautifully.
-
Spicy Kick: Mix in a teaspoon of cinnamon or a pinch of cayenne pepper to elevate the flavor profile with a warm, spicy note.
-
Dairy-Free Delight: Use coconut oil instead of butter and dairy-free chocolate chips for an equally delicious cookie that’s safe for lactose intolerant folks.
-
Savory Sweet: Incorporate a sprinkle of sea salt on top before baking to create a wonderful balance that highlights the sweetness of the cookies.
-
Caramel Swirls: Add dollops of caramel sauce into the dough before baking for melted pockets of gooey joy in each cookie.
-
Chewy Texture: Replace half the all-purpose flour with oat flour for a chewy, wholesome texture that’s utterly satisfying.
-
Choco-Mint: Fold in peppermint chocolate chips instead of regular chips for a refreshing twist, bringing a festive vibe to your cookie jar.
Get ready to discover new favorite versions of these cherished cookies!
How to Store and Freeze Santa’s Cookies
Room Temperature: Store Santa’s Cookies in an airtight container for up to 3 days to maintain their freshness and chewy texture.
Fridge: For longer storage, place the cookies in the refrigerator in a sealed container, where they’ll stay good for up to 1 week.
Freezer: You can freeze Santa’s Cookies by placing them in a freezer-safe bag or container for up to 3 months. Make sure to separate layers with parchment paper to prevent sticking.
Reheating: To enjoy cookies from the freezer, simply thaw at room temperature and then warm them in a microwave for about 10 seconds to regain their delicious softness.
Make Ahead Options
These Santa’s Cookies are perfect for busy home cooks looking to save time during the holiday rush! You can prepare the cookie dough up to 24 hours in advance—simply mix all the ingredients and store the dough in an airtight container in the refrigerator. To maintain their wonderful texture, make sure to allow the dough to sit at room temperature for about 10-15 minutes before baking. Alternatively, you can scoop the cookies onto the baking sheets and freeze them for up to 3 days; just bake directly from the freezer, adding a couple of extra minutes to the baking time. With these make-ahead options, you’ll have delicious, festive Santa’s Cookies ready with minimal effort when you need them!
Chef's Helpful Tips
- When making Santa’s Cookies, always ensure your butter is properly softened to create a smooth and creamy dough, which helps with even mixing.
- Avoid overmixing the dough after adding the flour, as this can lead to tough cookies instead of the desired chewy texture.
- Use a cookie scoop to maintain uniform cookie sizes, ensuring they bake evenly and look appealing.
- Remember to check your cookies a minute or two before the minimum baking time to prevent them from overbaking and losing their chewy centers.
Santa’s Cookies Recipe FAQs
What is the best way to select ripe ingredients for Santa’s Cookies?
Absolutely! For the butter, ensure it’s softened but not melted, letting it reach room temperature, which usually takes about 30 minutes out of the fridge. Always choose fresh eggs; they should be clean, without cracks, and within the expiration date. For the sugars, use light brown sugar that’s packed—this helps to create the chewy texture.
How should I store Santa’s Cookies to maintain their freshness?
Very good question! Store your Santa’s Cookies in an airtight container at room temperature for up to 3 days. This keeps them fresh and chewy. If you need to store them longer, keep them in the refrigerator for up to a week. Just make sure they’re sealed tightly to prevent them from absorbing any odors.
Can I freeze Santa’s Cookies? If so, how?
Yes, you can absolutely freeze Santa’s Cookies! To do this, let them cool completely after baking, then layer them in a freezer-safe bag or container. Be sure to separate each layer with parchment paper to avoid sticking. They can be frozen for up to 3 months. When you’re ready to enjoy them again, simply thaw at room temperature and warm them in the microwave for about 10 seconds for that just-baked softness!
What should I do if my cookie dough seems too dry or too wet?
If your cookie dough appears too dry, you can add a tiny splash of milk (about 1 teaspoon at a time) to help bring it together. On the other hand, if the dough is too wet, sprinkle in a bit more flour—be cautious and add just a tablespoon at a time until the consistency feels right. This will help you achieve that perfect chewy texture!
Are Santa’s Cookies safe for those with allergies?
Good question! Santa’s Cookies contain common allergens like gluten (all-purpose flour), dairy (butter), and eggs. If you’re handling allergies, consider using gluten-free flour, dairy-free butter substitutes, and egg replacers like flaxseed or applesauce. Always read ingredient labels carefully to accommodate any dietary needs.
Can I use other types of candies or chocolates in my Santa’s Cookies?
The more, the merrier! Feel free to get creative with your add-ins! You can swap out M&M’s for other festive chocolates or use butterscotch chips for a fun twist. Just remember to keep the total amount of mix-ins around 2 to 2 ½ cups to keep the dough balanced.
Santa’s Cookies
Ingredients
Equipment
Method
- Preheat your oven to 350°F. Line cookie sheets with parchment paper.
- Combine the softened butter and light and granulated sugars in a large mixing bowl. Beat for about 2 minutes until creamy.
- Add the eggs and vanilla extract to your mixture. Beat until well mixed.
- Incorporate the all-purpose flour, kosher salt, and baking soda. Mix JUST until combined.
- Fold in the semi-sweet chocolate chips, white chocolate chips, holiday M&M’s, and jimmies.
- Scoop the dough using a 2 Tablespoon cookie scoop onto the prepared baking sheets.
- Bake for 11-13 minutes, until edges are lightly browned.
- Cool the cookies on the baking sheet for a few minutes before transferring to a wire rack.

Leave a Comment