As I glanced around my kitchen, surrounded by half-opened bags of goodies from my last grocery haul, a sudden burst of inspiration struck me. I had all the ingredients for something sweet yet surprisingly simple—No-Bake Pinecone Truffles. Just the thought of these delightful treats brought a smile to my face, evoking memories of cozy gatherings and laughter filled with the aroma of chocolate.
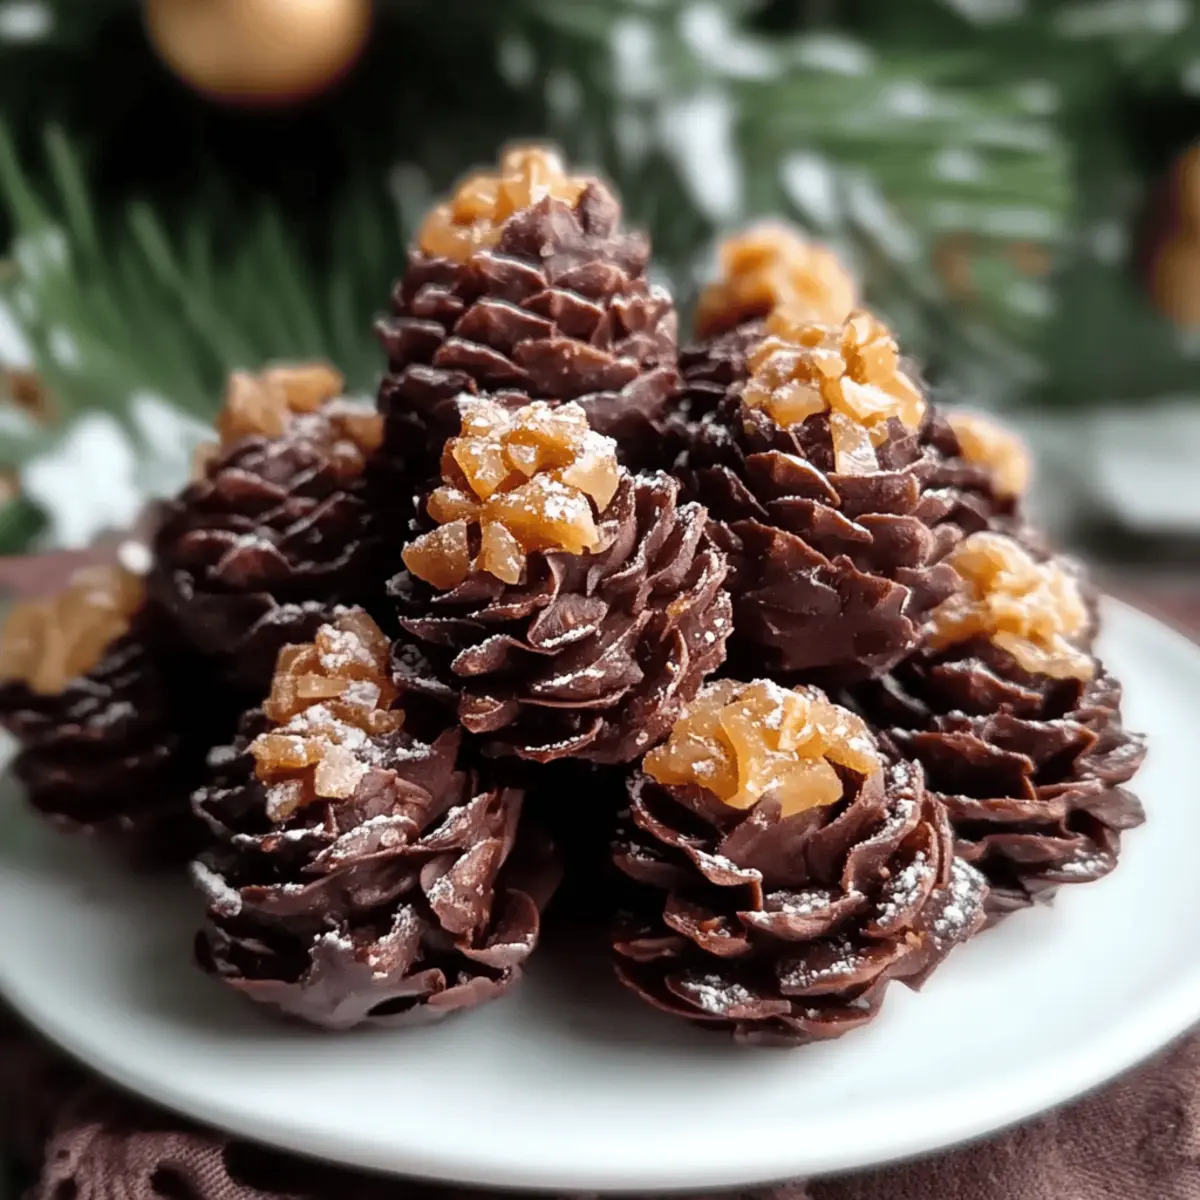
Picture this: rich vegan chocolate biscuits crushed to perfection, mingling with creamy dairy-free cream cheese and a hint of cocoa. Then, the magic happens. With a little craftiness, we transform them into whimsical truffle shapes resembling pinecones, each coated in luscious dark chocolate and adorned with crispy cornflakes. Not only are they a feast for the eyes, but they’re also a delightful solution for those moments when you crave something homemade, yet don’t want to spend hours in the kitchen.
So, gather your ingredients, roll up your sleeves, and let’s create these charming No-Bake Pinecone Truffles that will impress friends and family alike, while also being effortlessly kind to your taste buds!
Why You'll Love This No-Bake Pinecone Truffles
- These No-Bake Pinecone Truffles are wonderfully easy to make, requiring no baking skills at all.
- The rich combination of flavors, with creamy vegan chocolate biscuits and smooth dairy-free cream cheese, creates a decadent treat that everyone will love.
- They are incredibly versatile, making a perfect dessert for any occasion, from holiday gatherings to casual get-togethers.
- Visually stunning, these truffles resemble adorable pinecones and are sure to be a conversation starter at any event.
No-Bake Pinecone Truffles Ingredients
• Get ready to create something magical!
For the Truffle Mixture
- Vegan chocolate biscuits – finely crushed, these form the rich base of your No-Bake Pinecone Truffles.
- Dairy-free cream cheese – adds creaminess; feel free to substitute with regular cream cheese if you prefer.
- Unsweetened cocoa powder – for that extra chocolate kick; use organic for a deeper flavor.
For Coating and Decoration
- Dairy-free dark chocolate – melts beautifully for a luscious coating; opt for a higher cocoa content for richer taste.
- Vegan cornflakes – perfect for decoration; choose gluten-free if necessary to accommodate dietary needs.
- Icing sugar – light dusting adds a charming finish; makes for a delightful contrast against the dark chocolate.

How to Make No-Bake Pinecone Truffles
-
Prepare the tray: Line a baking tray with greaseproof paper and set it aside to make the cleanup easier later on. This will help your truffles come off smoothly after chilling.
-
Crush the biscuits: Process the vegan chocolate biscuits in a food processor until fine crumbs form. If you prefer, you can also crush them manually using a rolling pin. The finer the crumbs, the better the texture!
-
Combine ingredients: Transfer the crisp biscuit crumbs to a large mixing bowl. Add in the dairy-free cream cheese and cocoa powder. Mix everything together until it’s evenly incorporated and holds together nicely when pressed.
-
Shape the truffles: Using clean hands, roll tablespoon-sized portions (approximately 20g each) into balls. Pinch the tops slightly to create an oval shape that mimics a pinecone and place them on the prepared tray.
-
Decorate with cornflakes: Starting from the base, gently press cornflakes into each truffle, layering them upwards to recreate those charming pinecone scales. Use smaller flakes towards the top for a believable effect!
-
Chill in the freezer: Place the tray in the freezer for about 25 minutes or until the truffles are firm enough to coat. This step is crucial for ensuring your truffles hold their shape.
-
Melt the chocolate: Five minutes before removing your truffles from the freezer, melt the dairy-free dark chocolate in a heatproof bowl set over simmering water, or use a microwave in 20-second intervals until smooth and glossy.
-
Coat the truffles: Using a fork, dip each chilled truffle into the melted chocolate, making sure to spoon chocolate over to coat thoroughly. Allow any excess chocolate to drip off gently.
-
Set the chocolate: Return your coated truffles to the tray and place them back in the freezer for another 5–10 minutes until the chocolate is fully set.
-
Finish and serve: Once the chocolate is firm, lightly dust the cooled truffles with icing sugar for a special touch and serve immediately to enjoy this delightful treat!
Optional: Serve with fresh berries for a pop of color and flavor!
Exact quantities are listed in the recipe card below.
No-Bake Pinecone Truffles Variations
Feel free to play around with these delightful ideas and make this recipe truly your own!
-
Nut-Free: Swap the dairy-free cream cheese with silken tofu for a nut-free alternative that retains creaminess.
-
Sweetener Twist: Replace icing sugar with coconut sugar for a more caramel-like sweetness, adding a hint of depth to each truffle.
-
Add Spices: Incorporate a pinch of cinnamon or nutmeg into the truffle mixture for a warm, cozy flavor that evokes baking nostalgia.
-
Fruit Infusion: Mix in finely chopped dried fruits like cranberries or apricots to the truffle mixture for a burst of sweetness and texture.
-
Flavor Boost: Add a teaspoon of vanilla or almond extract. This small change offers depth, turning each bite into a fragrant delight.
-
Crunchy Surprise: Introduce chopped nuts or seeds into the truffle mix for an unexpected crunch that elevates the texture and adds healthy fats.
-
Spicy Kick: For those who love heat, a dash of chili powder or cayenne pepper can be added for a tantalizing contrast with the chocolate.
-
Altered Coating: Try rolling truffles in desiccated coconut or sprinkles instead of cornflakes for a colorful twist that also changes up the texture.
Make Ahead Options
These No-Bake Pinecone Truffles are perfect for busy home cooks looking to save time! You can prepare the truffle mixture (biscuit crumbs, dairy-free cream cheese, and cocoa powder) up to 24 hours in advance. Simply combine the ingredients and roll them into shapes, then cover tightly and refrigerate. For best results, wait to add the cornflake decoration and chocolate coating until just before serving to keep them fresh and crunchy. When you’re ready to enjoy, simply pull them out from the fridge, complete the decorating process, and let them chill briefly in the freezer while you melt the chocolate. This way, you’ll have delightful, homemade treats with minimal effort!
What to Serve with No-Bake Pinecone Truffles?
Elevate your dessert table with delightful pairings that enhance the sweet, whimsical charm of these truffles.
-
Fresh Berries: Bursting with juiciness, ripe strawberries or raspberries cut through the richness and bring a vibrant color contrast.
-
Whipped Coconut Cream: Light and airy, this fluffy topping gives a tropical twist that complements the chocolate flavors beautifully.
-
Vegan Vanilla Ice Cream: Creamy and cool, it creates a delightful juxtaposition with the truffle’s texture, perfect for a comforting treat.
-
Coffee or Espresso: The bold, bitter notes of coffee accentuate the sweetness of the truffles, making it a sophisticated pairing for after dinner.
-
Chocolate Fondue: Dip your truffles into a velvety chocolate fountain for an added layer of indulgence. It’s a fun, interactive dessert option!
-
Nutty Granola: Sprinkle a bit of crunchy granola for texture contrast; the nuts and oats create a satisfying crunch with each bite.
-
Sparkling Juice: Opt for a refreshing sparkling raspberry or cranberry juice to cleanse the palate and round out your sweet spread.
These pairings not only accentuate the flavors of your No-Bake Pinecone Truffles but also set the stage for a delightful gathering filled with laughter and sweet memories.
How to Store and Freeze No-Bake Pinecone Truffles
Room Temperature: Keep the truffles in an airtight container for up to 2 days. Avoid direct sunlight to maintain freshness.
Fridge: Store your No-Bake Pinecone Truffles in the refrigerator for up to 5 days. Use a sealed container to prevent them from drying out.
Freezer: For longer storage, freeze the truffles in a single layer on a tray before transferring them to an airtight container. They can last up to 3 months!
Reheating: Enjoy them chilled straight from the fridge or freezer. If they’ve thawed slightly, they’ll still taste delightful.
Chef's Helpful Tips
- When making No-Bake Pinecone Truffles, ensure your biscuit crumbs are as fine as possible for a smoother texture.
- A common mistake is not chilling the truffles long enough before coating, so don’t rush the freezing process to maintain their shape.
- Use a fork with a long handle for dipping to reduce mess and allow for even coating of chocolate on your truffles.
- For best results, melt your chocolate over low heat to prevent it from seizing up and keep an eye on it while it melts.
No-Bake Pinecone Truffles Recipe FAQs
What kind of biscuits should I use for the truffles?
I recommend using vegan chocolate biscuits for a rich base, but feel free to choose gluten-free options if necessary. You can even experiment with other types of biscuits, like digestive biscuits, to give a different flavor profile.
How do I store No-Bake Pinecone Truffles?
For room temperature, keep the truffles in an airtight container away from direct sunlight for up to 2 days. If you want to store them in the fridge, they’ll last for about 5 days in a sealed container. Make sure they’re well-sealed to prevent drying out!
Can I freeze No-Bake Pinecone Truffles?
Absolutely! To freeze, arrange the truffles in a single layer on a tray and place them in the freezer until firm. Then transfer them to an airtight container or freezer bag. They can stay fresh for up to 3 months. Just thaw them in the fridge before enjoying!
What if my chocolate seizes while melting?
Very few things are more frustrating than seized chocolate! If that happens, you can try to save it by adding a small amount of vegetable oil or coconut oil while it cools and gently stirring. Always melt over low heat to avoid this issue in the first place!
Can pets eat these truffles?
It’s best to keep No-Bake Pinecone Truffles away from pets, especially due to the presence of chocolate, which can be toxic to dogs and cats. Always store them securely out of reach to ensure your furry friends stay safe!
Are there any allergy considerations?
Yes, check labels on all your ingredients to avoid cross-contamination with allergens. If you’re making these truffles for someone with allergies, ensure the biscuits and chocolate are free from nuts or gluten, depending on their needs. Adjust ingredients accordingly for a safe treat!
No-Bake Pinecone Truffles
Ingredients
Equipment
Method
- Line a baking tray with greaseproof paper and set aside.
- Process the vegan chocolate biscuits in a food processor until fine crumbs form.
- Transfer biscuit crumbs to a mixing bowl. Add dairy-free cream cheese and cocoa powder. Mix well.
- Roll tablespoon-sized portions into oval shapes resembling pinecones and place on the prepared tray.
- Gently press cornflakes into each truffle, layering for effect.
- Freeze for about 25 minutes or until firm.
- Melt the dairy-free dark chocolate in a heatproof bowl.
- Dip each chilled truffle into the melted chocolate, spooning over to coat thoroughly.
- Return truffles to the tray and freeze for another 5-10 minutes until set.
- Dust with icing sugar before serving.
Leave a Comment