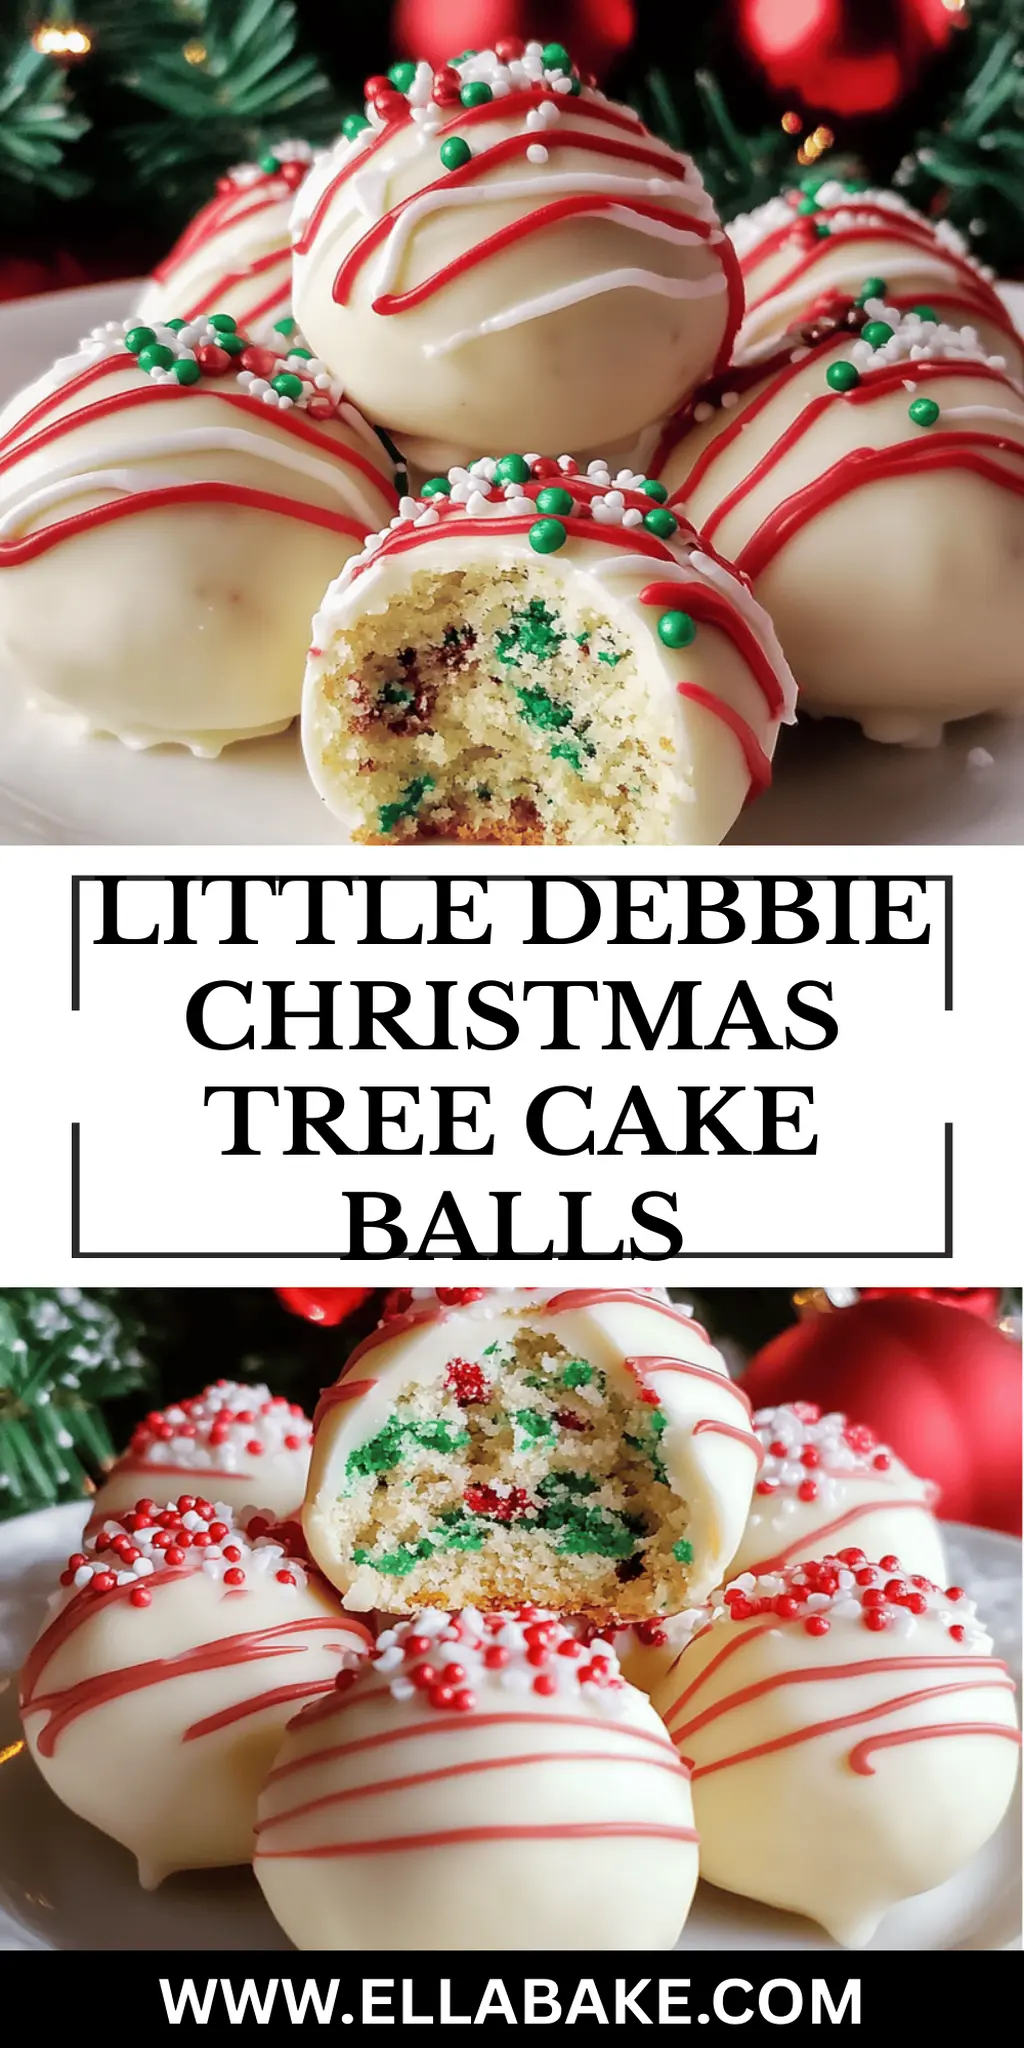
There’s something undeniably festive about the aroma of cream cheese and white chocolate mingling in your kitchen. As the holidays approach, I find myself yearning for treats that not only satisfy the sweet tooth but also evoke nostalgia—and these Little Debbie Christmas Tree Cake Balls do just that! Imagine indulging in rich, creamy cake bites that resemble the cherished snack cakes we all loved as kids, yet have an adult twist.

These cake balls are incredibly easy to whip up, perfect for a holiday gathering or an afternoon treat at home. With just a handful of ingredients, including those iconic Little Debbie cakes, you’ll create a delightful dessert that’s sure to impress friends and family alike. Just picture it: creamy, dreamy, and coated in a luscious white chocolate shell, these bites are not only a visual delight but also a burst of festive flavor in every single mouthful. Ready to bring a bit of holiday magic to your table? Let’s dive into this simple yet enchanting recipe!
Why You'll Love This Little Debbie Christmas Tree Cake Balls
- These Little Debbie Christmas Tree Cake Balls are incredibly easy to make, making them the perfect festive treat for any skill level in the kitchen.
- The delightful combination of cream cheese and white chocolate creates a rich and creamy flavor that is sure to satisfy your sweet tooth.
- Their festive appearance adds a beautiful touch to any holiday dessert table, making them visually appealing for gatherings.
- With minimal prep time and a quick freeze, you can whip up these delightful little bites in no time, ensuring that you spend less time in the kitchen and more time celebrating with loved ones.
- These cake balls are a guaranteed crowd-pleaser, bringing nostalgia and joy to everyone who takes a bite.
Little Debbie Christmas Tree Cake Balls Ingredients
For the Cake Balls
• Little Debbie vanilla Christmas tree snack cakes – unwrapped, these iconic treats add nostalgic flavor to the festive season.
• Cream cheese – softened to room temperature, it ensures a creamy texture that binds the flavors beautifully.
For the Coating
• White chocolate melting wafers – melting these provides a smooth, sweet shell that complements the cake balls perfectly.
• Red vanilla flavored melting candy wafers – used for piping decorative patterns, these add a pop of color and an extra sweet kick.
For the Topping
• Green sanding sugar sprinkles – these festive sprinkles create a delightful crunch and a holiday-inspired presentation.
These Little Debbie Christmas Tree Cake Balls are perfect for sharing and make for a joyous holiday treat that everyone will love!
How to Make Little Debbie Christmas Tree Cake Balls
-
Prepare your baking sheets: Line two large baking sheets with parchment paper or a silicone mat, making sure they’re ready for your delightful cake balls.
-
Mix the cream cheese: In a large mixing bowl, add the softened cream cheese and beat on medium speed with a handheld mixer for about 1-2 minutes until it’s fluffy and smooth.
-
Combine with cake: Break the Little Debbie vanilla Christmas tree snack cakes into smaller pieces and add them to the bowl of cream cheese. Mix on low speed until fully combined but keep some small cake pieces for texture.
-
Form the balls: Using a small cookie scoop, scoop out 1 tablespoon-sized portions of the mixture and roll them into smooth balls with your hands, channeling your inner artist!
-
Set on baking sheets: Place the cake balls onto one of the prepared baking sheets, repeat the scooping and rolling action until all the mixture is formed—there’s no such thing as too many!
-
Freeze for firmness: Pop the baking sheets into the freezer for 30-45 minutes until the cake balls are completely solid. They’ll be easier to coat later; trust me!
-
Melt the chocolate: Melt the white chocolate wafers according to the package directions and stir until smooth and glossy—this should be a heavenly sight!
-
Prepare for decorating: In another bowl, melt the red vanilla flavored candy wafers. Transfer this melted mix to a small piping bag, cutting off the tip for easy use later.
-
Coat the cake balls: Coat each cake ball in the melted white chocolate, gently tapping off any excess before placing them on the second baking sheet. They should look delightful and ready for their next step!
-
Decorate them: Pipe a decorative zig-zag pattern on top of each coated cake ball using the red vanilla candy, and sprinkle with green sanding sugar for that festive touch!
-
Let them set: Allow the cake balls to sit for 15-20 minutes until the coating is firm before serving—you want that perfect snap as you bite in!
Optional: Drizzle leftover melted chocolate over the top for an extra touch!
Exact quantities are listed in the recipe card below.
Make Ahead Options
These Little Debbie Christmas Tree Cake Balls are perfect for meal prep and can save you valuable time during the busy holiday season! You can prepare the cake ball mixture up to 24 hours in advance; just roll them into balls and refrigerate them until you’re ready to coat them. Once ready to serve, melt the white chocolate and coat each ball, then decorate with the red candy and green sprinkles. Alternatively, you can freeze the uncooked cake balls for up to 3 months—simply thaw in the fridge overnight before coating. Just pay attention to keeping the chocolate coating smooth by gently reheating it if needed, ensuring your cake balls are just as delicious when it’s time to enjoy!
What to Serve with Little Debbie Christmas Tree Cake Balls?
Create a magical holiday spread that will leave everyone smiling and satisfied.
- Festive Hot Cocoa: A rich, velvety hot chocolate topped with whipped cream adds a cozy touch to your dessert table.
- Gingerbread Cookies: The spiced flavors of gingerbread cookies perfectly contrast the sweet creaminess of the cake balls, creating a delightful holiday pairing.
- Peppermint Bark: This crunchy and minty treat enhances the festive spirit and offers a refreshing break from the richness of the cake balls.
- Fruit Platter: A colorful assortment of fresh fruits adds a light, refreshing element that balances the sweetness of the cake balls beautifully.
- Sparkling Apple Cider: This bubbly beverage is festive and fun, providing a crisp counterpoint to the richness of the cake balls while inviting joyful toasts.
- Pecan Pie Bars: The nutty, sweet flavors of pecan pie bars create a comforting accompaniment, perfect for those sweet tooth cravings during the holidays.
- Eggnog: Creamy and spiced, eggnog is a classic holiday drink that resonates perfectly with the indulgent flavors of your cake balls.
- Christmas Sugar Cookies: These beautifully decorated cookies not only bring a pop of color but also harmonize wonderfully with the nostalgic notes of the cake balls.
Little Debbie Christmas Tree Cake Balls Variations
Feel free to sprinkle some joy into these delightful cake balls with unique twists that cater to every palate.
- Gluten-Free: Use gluten-free snack cakes instead of Little Debbie for a similar flavor without the gluten.
- Nutty Crunch: Add finely chopped nuts to the mixture for a delightful crunch that brings a new texture and flavor dimension.
- Peppermint Bliss: Mix in peppermint extract or crushed peppermint candies for a refreshing holiday twist that pairs beautifully with chocolate.
- Chocolate Coating: Swap white chocolate for dark or milk chocolate for a richer flavor that chocolate lovers will adore.
- Fruit-Filled: Incorporate chopped dried fruits like cranberries or cherries into the blend for a burst of sweetness and chewy texture.
- Coconut Coating: Roll the finished cake balls in shredded coconut for a tropical flair that complements the holiday spirit.
- Spiced Up: Add a pinch of cinnamon or nutmeg to the cream cheese mix for cozy, warming flavors that are perfect for chilly evenings.
- Colorful Melting Wafers: Use a variety of colored melting wafers to decorate, making these cake balls instantly more festive and fun!
Each variation offers a charming twist to keep the festive spirit alive and cater to everyone’s tastes!
How to Store and Freeze Little Debbie Christmas Tree Cake Balls
Fridge: Store your Little Debbie Christmas Tree Cake Balls in an airtight container in the fridge for up to 3 days. They’ll stay fresh and creamy, perfect for snacking!
Freezer: For longer storage, place the cake balls in a single layer on a baking sheet to freeze for 1-2 hours. Then, transfer them to a freezer-safe container for up to 2 months.
Thawing: When ready to enjoy, simply remove from the freezer and let them thaw in the fridge for several hours or at room temperature for about 30 minutes.
Reheating: These delightful cake balls are best served chilled, so no need to reheat them—just savor their creamy goodness straight from the fridge!
Chef's Helpful Tips
- To ensure your Little Debbie Christmas Tree Cake Balls have a perfectly creamy texture, always remember to soften the cream cheese to room temperature before mixing.
- A common mistake is overmixing the cake and cream cheese; aim for a blended mixture with some small cake pieces for added texture.
- When coating the cake balls, tapping off excess melted white chocolate ensures a smooth, even layer and prevents clumping.
- Finally, allowing the cake balls to set for 15-20 minutes at room temperature will give you that satisfying chocolate coating that holds its shape beautifully.
Little Debbie Christmas Tree Cake Balls Recipe FAQs
How do I choose the right ripeness of cream cheese?
Absolutely! For the best texture, make sure to use cream cheese that is fully softened at room temperature. This usually takes about 30 minutes after removing it from the fridge. If the cream cheese is too cold, it won’t mix smoothly and might make your cake balls lumpy!
How should I store Little Debbie Christmas Tree Cake Balls?
You can store them in an airtight container in the fridge for up to 3 days. If you prefer to keep them longer, place them in a single layer on a baking sheet and freeze for 1-2 hours. Once solid, transfer to a freezer-safe container for up to 2 months.
Can I freeze these cake balls? How do I do it correctly?
Absolutely! Start by placing your cake balls in a single layer on a baking sheet. Freeze them for 1-2 hours until they’re firm. Then, move the solid cake balls to a freezer-safe container, separating layers with parchment paper if stacking. They can be stored frozen for up to 2 months. To enjoy, simply thaw them in the fridge for several hours or leave them out at room temperature for about 30 minutes.
What if my cake balls are too soft to roll?
Very! If your mixture is too soft to form into balls, this might be because the cream cheese was overmixed or not cold enough. Try chilling the mixture in the fridge for 15-30 minutes. If that doesn’t work, you could add a bit of crushed cookie or graham cracker to help thicken the mixture a bit.
Are there any dietary considerations I should keep in mind?
Yes, keep in mind that these Little Debbie Christmas Tree Cake Balls contain dairy from the cream cheese and chocolate. If you have dietary restrictions, consider using dairy-free alternatives for the cream cheese and chocolate wafers. Additionally, always check for allergens if sharing with guests, as they may contain gluten and soy from the snack cakes and melting wafers.
Little Debbie Christmas Tree Cake Balls
Ingredients
Equipment
Method
- Line two large baking sheets with parchment paper or a silicone mat.
- In a large mixing bowl, add the softened cream cheese and beat on medium speed until fluffy and smooth.
- Break the Little Debbie cakes into smaller pieces and add to the cream cheese. Mix on low speed until fully combined.
- Using a small cookie scoop, scoop out 1 tablespoon-sized portions and roll into smooth balls.
- Place the cake balls onto one of the prepared baking sheets and repeat until all mixture is formed.
- Freeze the baking sheets for 30-45 minutes until the cake balls are solid.
- Melt the white chocolate wafers according to the package directions.
- Melt the red vanilla candy wafers and transfer to a small piping bag.
- Coat each cake ball in melted white chocolate and place on the second baking sheet.
- Pipe a decorative zig-zag pattern on top of each coated cake ball with the red vanilla candy and sprinkle with green sanding sugar.
- Allow the cake balls to sit for 15-20 minutes until the coating is firm.

Leave a Comment