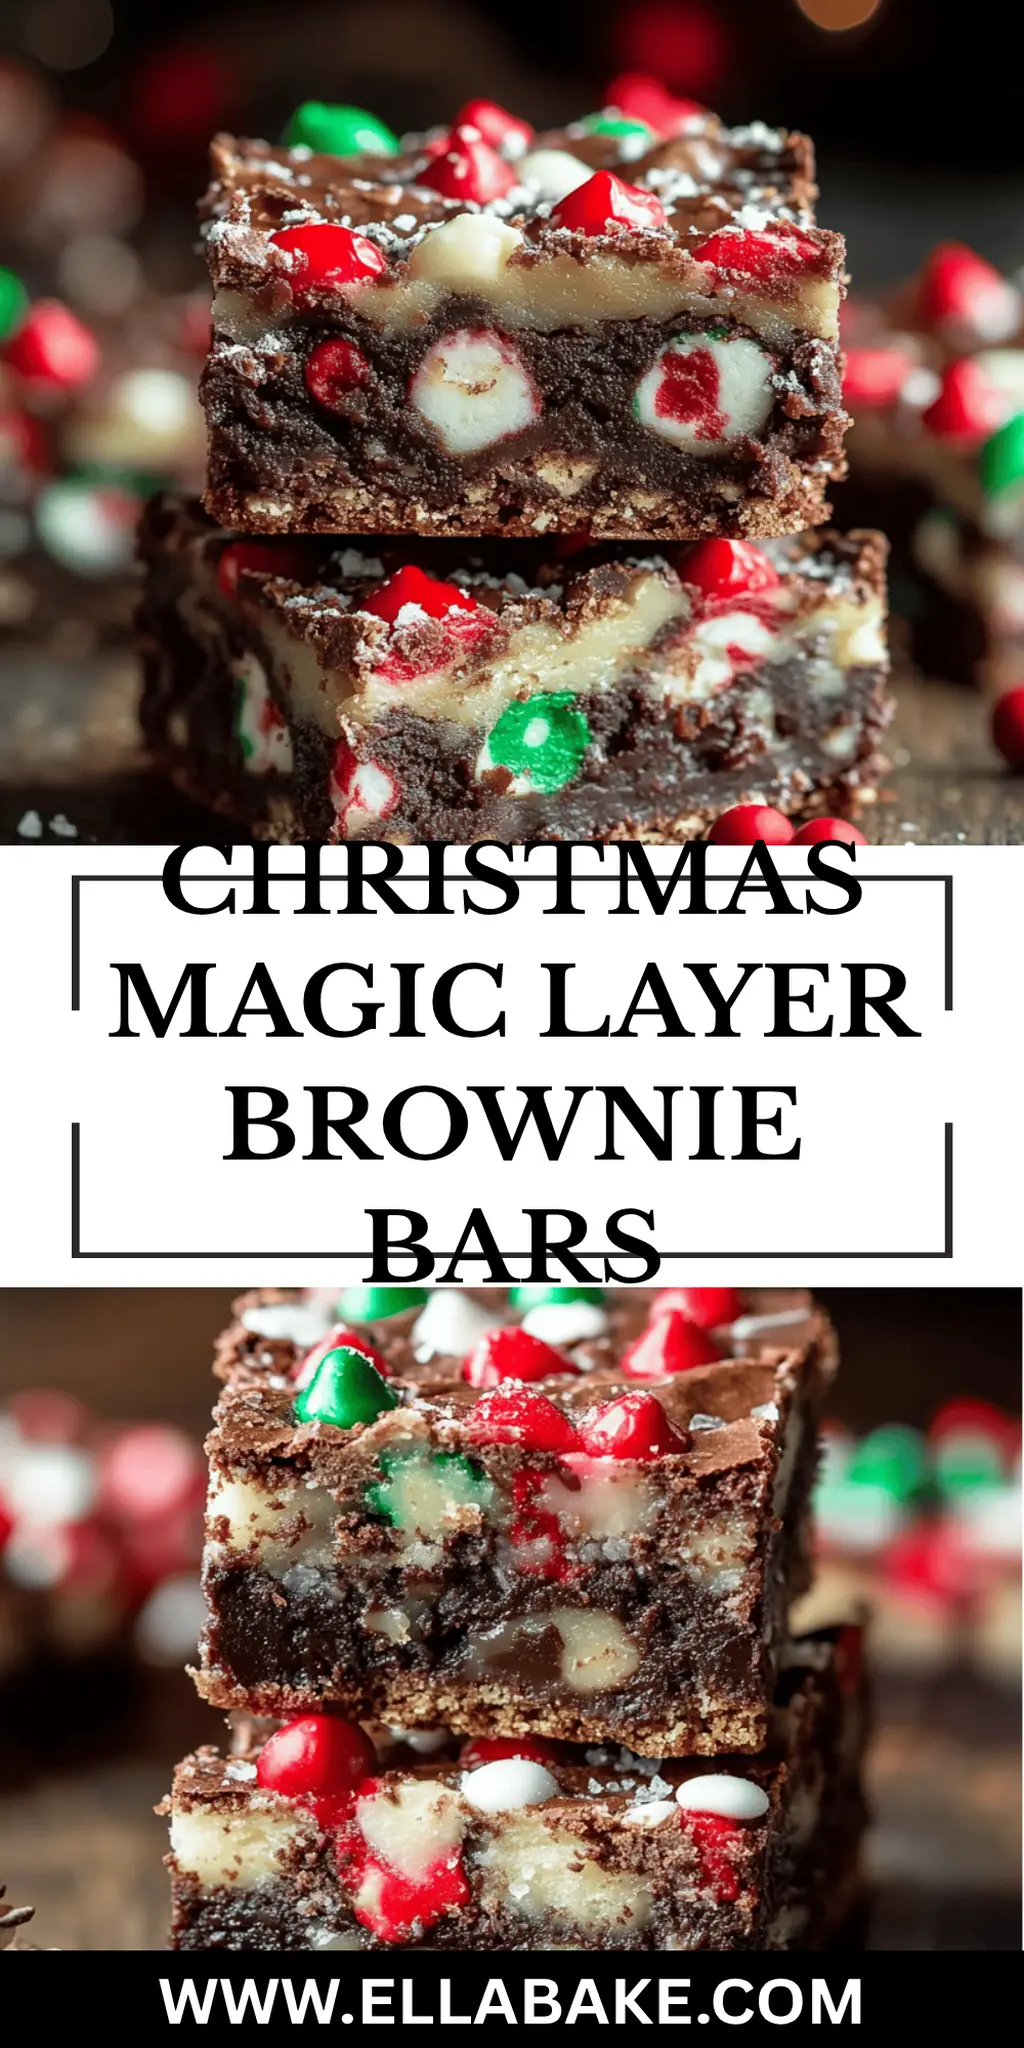
There’s something truly special about gathering with friends and family during the holiday season, especially when delicious aromas fill the air! One of my favorite recent discoveries is the Christmas Magic Layer Brownie Bars. These indulgent treats just scream festive cheer and warmth, transforming any ordinary gathering into a magical celebration.

As I was experimenting with textures and flavors in the kitchen, the inspiration for these bars struck me. Imagine biting into a gooey chocolate brownie topped with a luscious layer of coconut and festive M&Ms—every square is a delightful surprise! Plus, they’re surprisingly easy to whip up, making them the perfect treat for any holiday potluck or cozy family movie night.
Get ready to dazzle your loved ones with a dessert that requires just over an hour to prepare—your taste buds will thank you! Let’s dive into the recipe and create some sweet holiday magic together!
Why You'll Love This Christmas Magic Layer Brownie Bars
- These Christmas Magic Layer Brownie Bars are incredibly easy to make, so you can spend less time in the kitchen and more time enjoying the festive season with loved ones.
- Their rich, gooey chocolate flavor combined with the delightful textures of coconut and M&Ms creates a dessert that is nothing short of heavenly.
- Not only are they perfect for holiday gatherings, but their vibrant, colorful layers make for a visually stunning centerpiece on any dessert table.
- With a quick prep time and a crowd-pleasing appeal, these bars will be the highlight of your holiday celebrations.
Christmas Magic Layer Brownie Bars Ingredients
For the Brownie Base
- Semi-sweet chocolate chips – adds a rich chocolate flavor to the bars.
- Salted butter – enhances the brownie’s moistness and richness.
- Granulated sugar – sweetens the mixture and balances the flavors.
- Large eggs – provide structure and help the brownies rise.
- Large egg yolk – adds extra moisture for a fudgy texture.
- All-purpose flour – gives the brownie structure; be careful not to overmix.
- Vanilla – enriches the chocolate flavor with a delightful aroma.
For the Toppings
- Nuts (optional) – add crunch; feel free to use your favorites such as walnuts or pecans.
- Mini holiday M&Ms – bring festive color and a fun crunch to these Christmas Magic Layer Brownie Bars.
- Regular Holiday M&Ms – provide an extra layer of sweetness and festive charm.
- More semi-sweet chocolate chips – ensures a gooey chocolate experience in every bite.
- Sweetened flaked coconut – lends a tropical twist and a chewy texture.
- Sweetened condensed milk – creates a creamy layer that holds everything together.
- Holiday sprinkles – perfect for a festive touch that will make your bars sparkle!
How to Make Christmas Magic Layer Brownie Bars
-
Preheat the oven to 350°F and prepare your baking pan by lining it with foil or parchment paper. A light spray of nonstick cooking spray ensures easy removal later.
-
Melt the butter and semi-sweet chocolate chips together in a large microwaveable bowl. Microwave on high for 30 seconds, then stir. Continue to microwave in 30-second intervals until everything is melted and smooth.
-
Combine the sugar, vanilla, and eggs. Beat them into the melted chocolate mixture until it’s well blended and silky. This creates the perfect foundation for your brownies!
-
Stir in the all-purpose flour, mixing just until combined. Pour the rich brownie batter into your prepared baking dish, spreading it evenly across the pan.
-
Bake in your preheated oven for 20 minutes. The brownies will jiggle slightly but should be set on the top. This ensures a fudgy texture later!
-
Layer the toppings: First, sprinkle on the nuts (if using), then half of the chocolate chips, half of the M&Ms, and all of the shredded coconut. Drizzle the sweetened condensed milk evenly over your layered toppings.
-
Finish baking for an additional 25 minutes or until the edges are golden brown and the middle is set. If the top begins to brown too quickly, simply tent it loosely with foil.
-
Cool completely before cutting into squares. A sharp knife will help you achieve those perfect brownie bars.
-
Store leftovers in a tightly sealed container for up to one week. They’ll still be delicious when you’re ready for a sweet treat!
Optional: Add a scoop of vanilla ice cream on top for an extra indulgence!
Exact quantities are listed in the recipe card below.
What to Serve with Christmas Magic Layer Brownie Bars?
Bring your festive dessert table to life with delightful accompaniments that elevate your holiday experience!
-
Fresh Whipped Cream: A dollop of lightly sweetened cream brings a luscious and airy contrast to the rich brownie bars.
-
Vanilla Ice Cream: Indulge in the classic pairing of warm brownies and cold ice cream—perfect for a cozy dessert moment. The melty ice cream enhances the chocolate flavors beautifully.
-
Hot Chocolate: Serve an inviting cup of creamy hot chocolate on the side for an extra splash of joy. It’s the perfect drink to sip as you enjoy the sweetness!
-
Fruit Salad: Balance the decadent flavors with a refreshing fruit salad. The bright, tart notes of citrus and berries will cleanse your palate and lift your spirits.
-
Peppermint Bark: For a festive touch, add a few pieces of peppermint bark. Its crunchy texture and minty flavor complement the richness of the brownie bars.
-
Coffee or Espresso: Pairing these bars with a strong cup of coffee or a velvety espresso provides a wonderful contrast to their sweetness, making each bite even more enjoyable.
-
Nutty Caramel Sauce: Drizzling a homemade or store-bought nutty caramel sauce on top adds a delightful layer of flavor and extra richness.
-
Seasonal Spiced Tea: A warm cup of spiced tea enhances the cozy vibes of your gathering. The aromatic spices will harmonize beautifully with the chocolatey goodness.
Make Ahead Options
These Christmas Magic Layer Brownie Bars are perfect for busy home cooks looking to save time! You can prepare the brownie base and layer it with the nuts, coconut, and half of the chocolate chips up to 24 hours in advance. Simply cover the unbaked layered dish with plastic wrap and refrigerate to prevent drying out. When you’re ready to finish, pour the sweetened condensed milk over the top, sprinkle with the remaining chocolate chips and M&Ms, then bake according to the recipe instructions. This way, you’ll have fresh, gooey brownies without the last-minute hassle—a truly magical treat to make your holiday gatherings delightful!
How to Store and Freeze Christmas Magic Layer Brownie Bars
Room Temperature: Store tightly covered at room temperature for up to 3 days to maintain that delicious, gooey texture.
Fridge: For extended freshness, keep the brownie bars in an airtight container in the fridge for up to a week, ensuring they stay moist and flavorful.
Freezer: To enjoy these delightful treats later, freeze the brownie bars in an airtight container for up to 3 months. Layer parchment paper between bars to prevent sticking.
Reheating: When you’re ready to indulge, simply thaw in the fridge overnight or microwave for 10-15 seconds to revive their gooey goodness.
Christmas Magic Layer Brownie Bars Variations
Feel free to get creative with these fun twists that will elevate your Christmas Magic Layer Brownie Bars to new delicious heights!
-
Nut-Free: Omit the nuts entirely or replace them with extra chocolate chips for a completely nut-free treat. The bars will still be delightful and gooey!
-
Coconut-Free: Substitute the coconut with crushed graham crackers for a different texture and a taste reminiscent of s’mores. This change adds an unexpected crunch!
-
Dairy-Free: Use dairy-free chocolate chips and coconut cream in place of sweetened condensed milk. It’s a vegan twist that doesn’t skimp on flavor.
-
Spicy Kick: Mix in a pinch of cayenne pepper or chili powder to the brownie batter for a surprising heat that pairs beautifully with rich chocolate.
-
Fruit Fusion: Add dried cherries or cranberries into the topping mix for a burst of fruity sweetness that complements the chocolate flavors wonderfully.
-
Mint Chocolate: Incorporate a few drops of peppermint extract in the brownie batter or swap regular M&Ms for mint-flavored ones for a refreshing minty twist.
-
Cookie Dough Layer: Instead of coconut, try adding a layer of cookie dough made with safe-to-eat raw flour for an enchanting, sweet surprise in every bite.
-
Fruity Toppings: Add fresh raspberries or thinly sliced strawberries on top of the sweetened condensed milk before the final bake for a lovely fruity contrast.
With these variations, you’ll never run out of ways to make these brownie bars your own—it’s all about personal touch!
Chef's Helpful Tips
- When making Christmas Magic Layer Brownie Bars, ensure your butter and chocolate are fully melted and combined for the best texture.
- Be careful not to overmix the flour into the brownie batter, as this can result in dense brownies.
- Remember that the brownies might seem undercooked when you take them out as they will continue to set while cooling.
- For the toppings, layering evenly and distributing the sweetened condensed milk will help ensure a mouthwatering blend of flavors throughout each bite.
Christmas Magic Layer Brownie Bars Recipe FAQs
How do I choose the right ripeness for the ingredients?
Absolutely! For the freshest flavor, ensure your eggs are large and at room temperature. While chocolate chips don’t have a ripeness factor, check the expiration date to guarantee they’ll melt beautifully. If you’re adding nuts, opt for whole, fresh nuts without dark spots or an off smell.
What’s the best way to store leftover Christmas Magic Layer Brownie Bars?
To keep your brownie bars fresh, store them in a tightly sealed container at room temperature for up to 3 days. If you want to extend their life, place them in the refrigerator in an airtight container for up to a week. Remember, they taste best when they’re freshly made, but chilling them slightly can actually enhance their fudgy texture!
Can I freeze Christmas Magic Layer Brownie Bars?
Certainly! To freeze, first cool your brownie bars completely. Then, cut them into squares and layer parchment paper between each square to prevent sticking. Place them in an airtight container and freeze for up to 3 months. When you’re ready to enjoy, simply thaw them in the fridge overnight, or pop them in the microwave for 10-15 seconds to bring back their gooey texture.
What should I do if my brownies turn out too dry?
Very! If your brownie bars end up dry, be sure to check your baking time next time. It’s key to remove them when they are set but still a little jiggly in the middle, as they continue to firm up while cooling. Additionally, you could try adding more sweetened condensed milk to enhance the moistness in future batches.
Are Christmas Magic Layer Brownie Bars safe for pets or individuals with allergies?
Definitely! As a general rule, chocolate is hazardous to dogs, so it’s best to keep these bars away from them. For people with nut allergies, you can either skip the nuts or replace them with seeds like sunflower seeds for a similar crunch. To accommodate gluten-free diets, substitute all-purpose flour with a 1:1 gluten-free blend for delicious results.
Can I make alterations for dietary considerations?
The more the merrier! If you’re looking to make these brownie bars vegan, you can use flaxseed meal mixed with water as an egg substitute—1 tablespoon of flaxseed meal with 2.5 tablespoons of water per egg will do the trick. Additionally, swap the butter for coconut oil and use dairy-free chocolate chips for a plant-based delight!
Christmas Magic Layer Brownie Bars
Ingredients
Equipment
Method
- Preheat the oven to 350°F and prepare your baking pan by lining it with foil or parchment paper.
- Melt the butter and semi-sweet chocolate chips together in a large microwaveable bowl.
- Combine the sugar, vanilla, and eggs. Beat them into the melted chocolate mixture until well blended.
- Stir in the all-purpose flour, mixing just until combined. Pour the brownie batter into your prepared baking dish.
- Bake for 20 minutes until the brownies jiggle slightly but are set on top.
- Layer the toppings: sprinkle on the nuts (if using), half of the chocolate chips, half of the M&Ms, and all of the shredded coconut.
- Drizzle the sweetened condensed milk evenly over the layered toppings.
- Finish baking for an additional 25 minutes until the edges are golden brown and the middle is set.
- Cool completely before cutting into squares.
- Store leftovers in a tightly sealed container for up to one week.

Leave a Comment