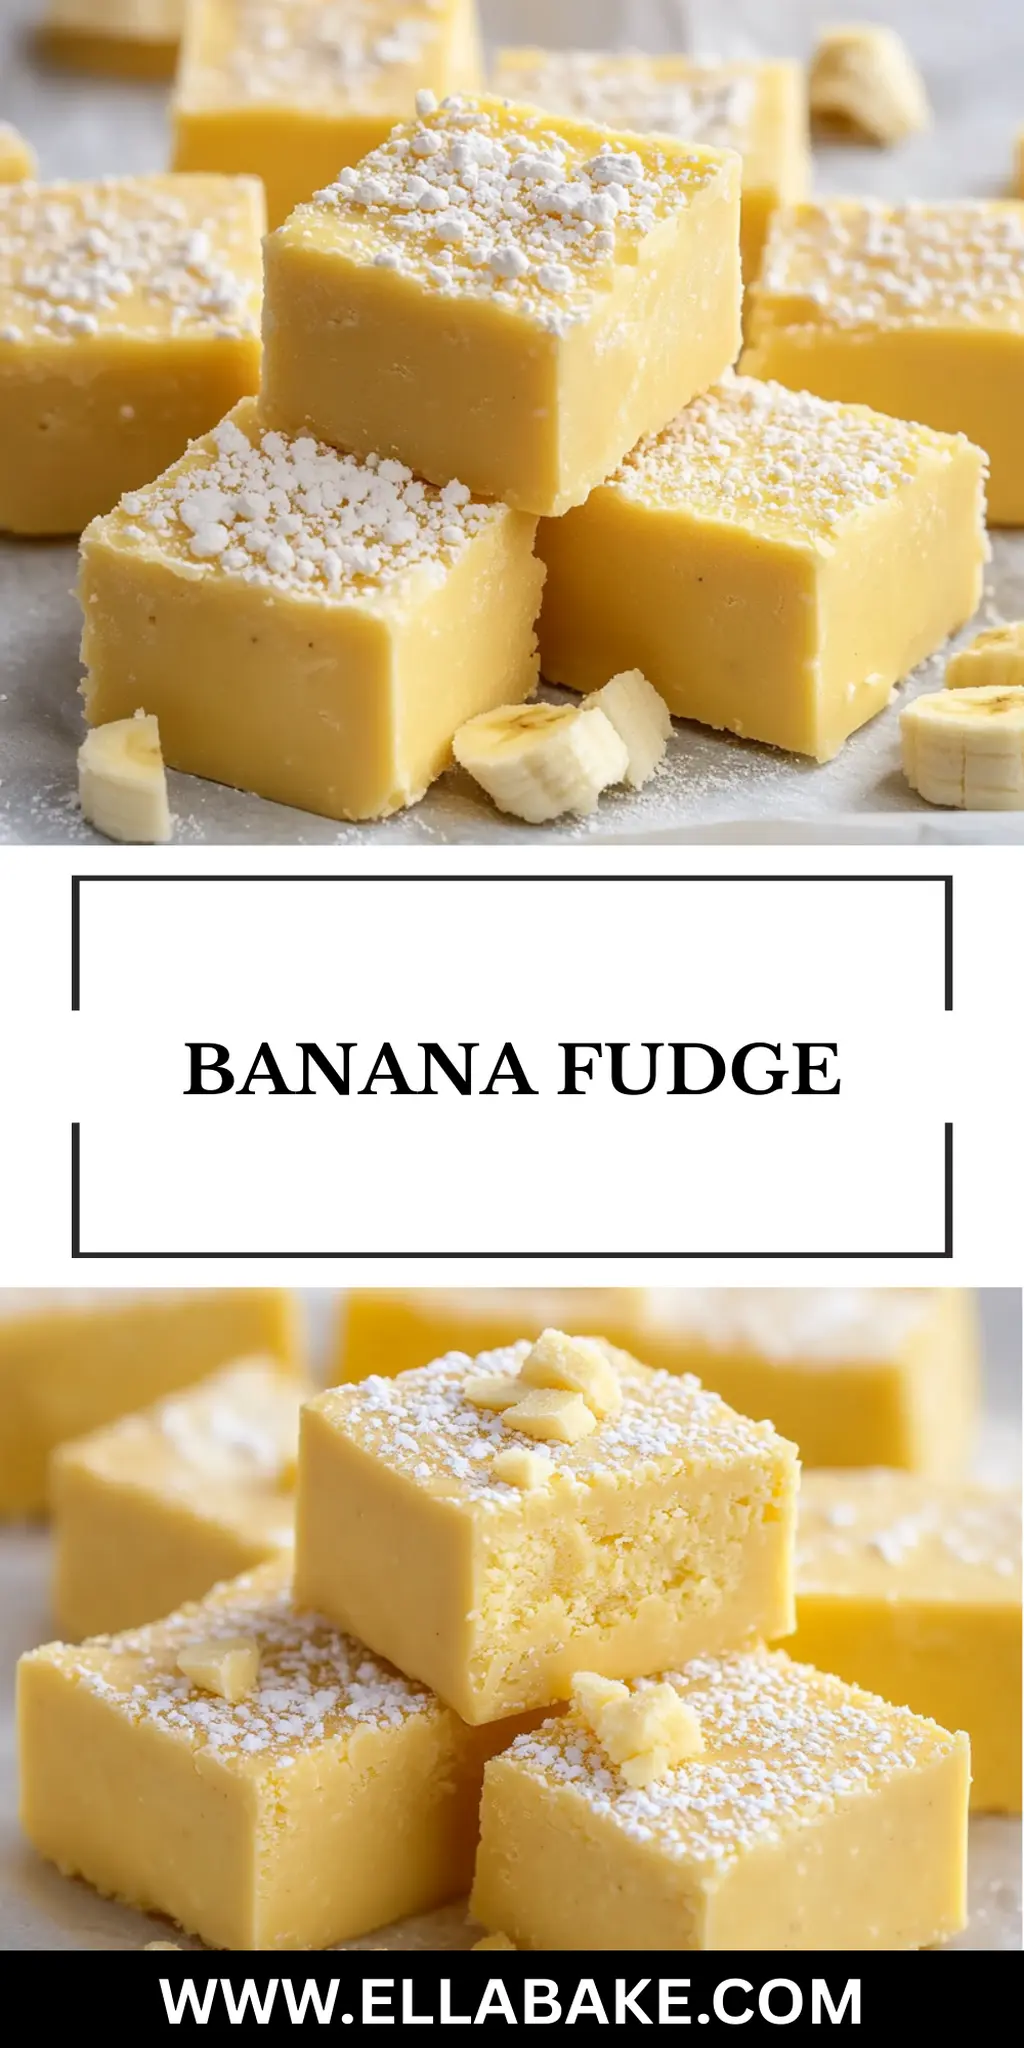
When I first combined the sweet, creamy taste of banana with velvety fudge, I knew I had stumbled onto something special. The moment you heat the butter and cream together, the kitchen fills with a comforting aroma that brings back childhood memories of simpler times and treats that felt like pure indulgence. This Banana Fudge is not just a dessert; it’s a sweet hug that wraps around you.
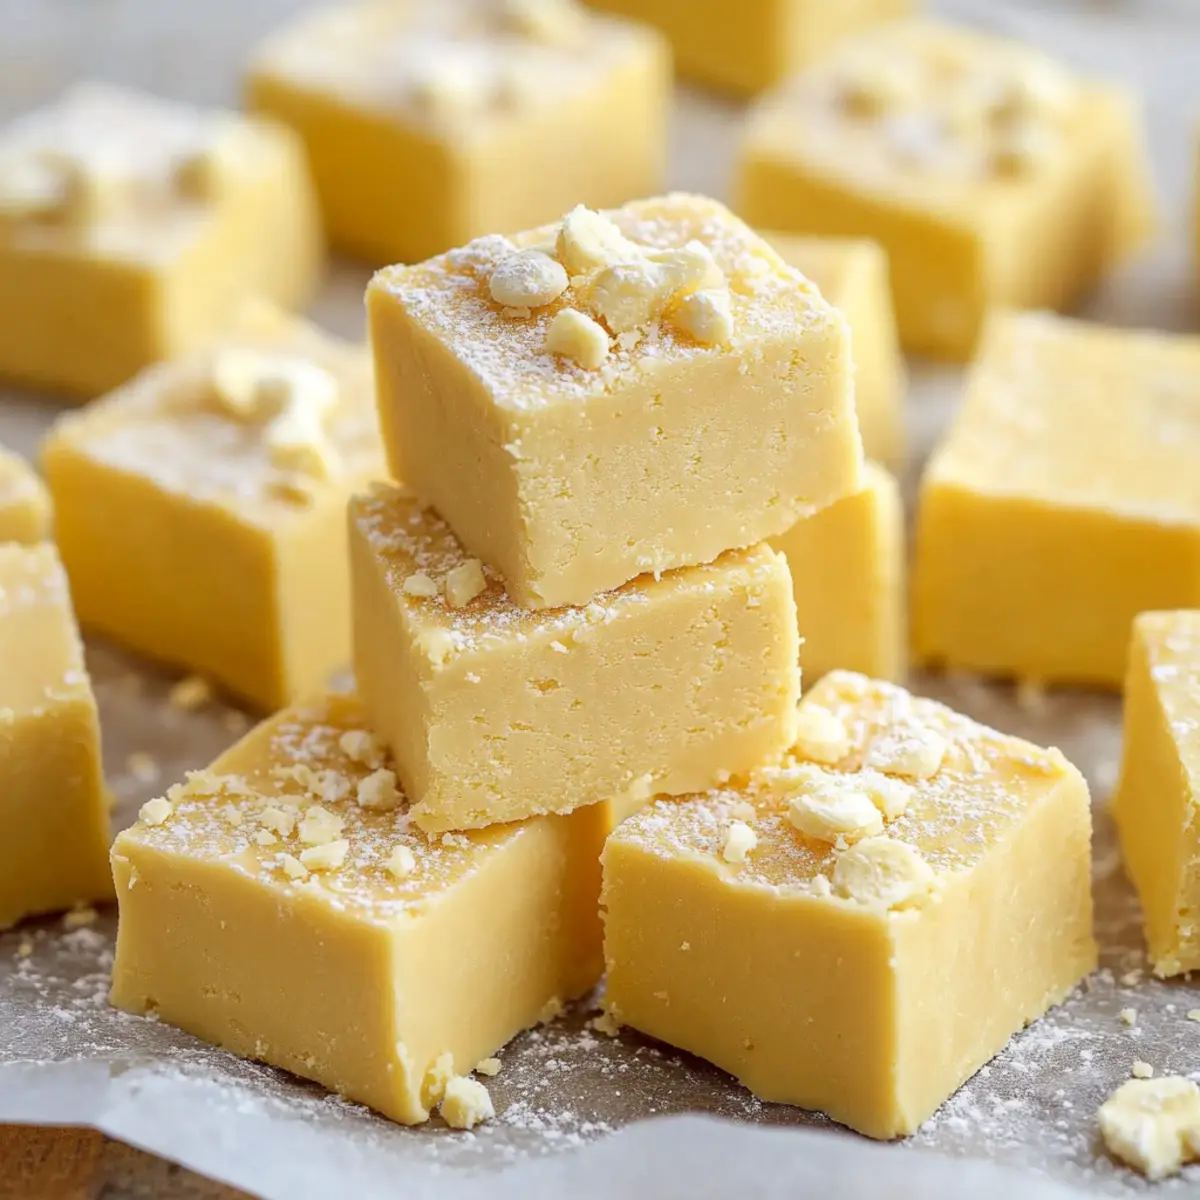
Perfect for sharing at gatherings or quietly savoring at the end of a long day, it combines easy-to-find ingredients that elevate your homemade treat game without the hassle. Imagine cutting into a piece and unveiling its luscious layers of flavor, each bite bursting with that delightful combo of banana and marshmallow. Trust me, it’ll be hard to resist reaching for just one more. Whether you’re a seasoned chef or someone rediscovering the joys of cooking at home, this recipe is bound to become a favorite!
Why You'll Love This Banana Fudge
- This recipe is incredibly easy to make, allowing you to whip up a decadent treat in no time.
- The flavor combination of banana and marshmallow creates a delightful sweetness that will leave everyone wanting more.
- Its versatility means you can easily customize it with different toppings or serve it on special occasions.
- Plus, the vibrant yellow hue and creamy texture make it visually stunning, perfect for impressing your guests.
Banana Fudge Ingredients
• Dive into the delightful flavors!
For the Fudge Base
- Salted sweet cream butter – a rich base that adds creaminess.
- Half and half – ensures a luscious texture; whole milk can be a good substitute.
- Heavy cream – adds that silky richness; avoid low-fat versions for best results.
- Clear vanilla flavoring – enhances the overall flavor without altering the color.
- Granulated sugar – sweetens the fudge; brown sugar can add a deeper flavor.
For the Flavor and Color
- Banana flavoring – brings that unmistakable banana essence; natural banana extract works too.
- Yellow food color gel – achieves that eye-catching vibrant hue; use sparingly for a subtle touch.
For Mix-Ins
- White baking chips – melt in to create a creamy, sweet layer; consider dark chocolate chips for contrast.
- Marshmallow fluff – adds lightness and fluffiness; it’s key for that perfect fudge texture.
Optional Garnish
- Crushed Nilla wafers – sprinkle on top for added crunch and flavor; any cookie crumbs can work as a substitute.
This Banana Fudge recipe is sure to satisfy your sweet tooth while being a standout treat at any gathering!
How to Make Banana Fudge
-
Line the Dish: Prepare a 9×9-inch baking dish by lining it with parchment paper, ensuring it comes up on all sides. Lightly spray with nonstick cooking spray to prevent sticking, then set aside.
-
Mix Flavoring: In a small glass bowl, combine the banana flavoring and yellow food color gel. Stir well to blend the flavors and colors, then set it aside for later.
-
Melt Ingredients: In a heavy-bottomed saucepan, add the salted sweet cream butter, half and half, heavy cream, and clear vanilla flavoring. Heat over medium, stirring continuously until everything is melted and bubbly.
-
Simmer the Sugar: Gradually add in the granulated sugar while stirring constantly. Bring the mixture to a simmer, which should take about 6 to 7 minutes. Allow it to simmer for another 3 minutes before removing from heat.
-
Melt the Chips: Stir in the white baking chips, then cover the saucepan. Let it sit for 3 to 4 minutes so the chips can melt thoroughly.
-
Incorporate Fluff: Once melted, add the marshmallow fluff to the saucepan, stirring until it’s fully incorporated and creamy, achieving that dreamy fudge texture.
-
Add Flavor Mixture: Pour in the banana flavor and yellow food gel mixture. Stir well until the fudge reaches a uniform color and the banana aroma fills your kitchen.
-
Spread the Mixture: Use a spatula to spread the fudge mixture evenly into the prepared baking dish. If desired, sprinkle crushed Nilla wafers on top for some added crunch, then cover with aluminum foil.
-
Let it Set: Allow the fudge to sit at room temperature for 30 minutes before transferring to the refrigerator. Chill for at least four hours to achieve the perfect set.
-
Cut and Serve: Once fully set, lift the fudge out using the parchment paper and cut into 25 delightful pieces. Keep refrigerated until you’re ready to enjoy or share!
Optional: For an extra touch, drizzle melted chocolate over the top before chilling.
Exact quantities are listed in the recipe card below.
Banana Fudge Variations
Invite your creativity to shine as you explore these fun and delicious twists on your Banana Fudge!
-
Nutty Delight: Add 1 cup of chopped walnuts or pecans for a crunchy texture that contrasts beautifully with the creamy fudge. The nutty flavor enhances the sweetness of the banana, creating a new favorite.
-
Chocolate Swirl: Stir in ½ cup melted dark chocolate into the fudge mixture before spreading it into the pan. This adds a rich, decadent flavor that elevates the overall treat. A little chocolate never hurts!
-
Peanut Butter Fudge: Fold in ½ cup of creamy peanut butter for a rich and nutty twist. The combination of banana and peanut butter will have you reliving those childhood sandwiches in every delightful bite.
-
Spicy Kick: Sprinkle a pinch of cayenne pepper or add a few drops of hot sauce to the fudge mixture for an unexpected sweetness with a fiery twist. It’s a daring adventure for those who love heat!
-
Berry Bliss: Fold in 1 cup of freeze-dried strawberries or raspberries before spreading the fudge in the pan. This will add a pop of color and bright fruit flavor, making every piece a fruity surprise.
-
Vegan Option: Swap the butter for coconut oil, use coconut cream instead of half and half and heavy cream, and replace white baking chips with vegan chocolate chips. This way, everyone can indulge!
-
Coconut Cream: Mix in 1 cup of shredded coconut for a tropical flair. The coconut adds a chewy texture and complements the banana beautifully, whisking you away to a sunny beach with each piece.
-
Maple Infusion: Replace granulated sugar with 2 cups of pure maple syrup for a unique, rich flavor. The subtle maple notes will harmonize beautifully with the banana, offering a seasonal touch you won’t want to miss.
Enjoy the fun of customizing your Banana Fudge, making it uniquely yours!
How to Store and Freeze Banana Fudge
Fridge: Store your Banana Fudge in an airtight container in the refrigerator for up to 2 weeks. This will keep it fresh and delicious for those sweet cravings.
Freezer: For longer storage, wrap the fudge tightly in plastic wrap, then place it in a freezer-safe bag. It can be frozen for up to 3 months; just remember to label it!
Thawing: When you’re ready to enjoy your frozen Banana Fudge, transfer it to the fridge and allow it to thaw overnight before serving.
Reheating: If you prefer warmed fudge, gently heat it in the microwave in 10-second intervals until just warm, being careful not to melt it completely.
Make Ahead Options
These Banana Fudge treats are perfect for meal prep enthusiasts! You can prepare the fudge mixture up to 24 hours in advance by following the initial steps until spreading the mixture into the baking dish. Alternatively, if you prefer, you can make the fudge and then keep it refrigerated for up to 3 days before serving. Just remember to cover it tightly with plastic wrap or aluminum foil to maintain its creamy texture and prevent it from drying out. When you’re ready to enjoy, simply slice it into pieces and let it sit at room temperature for about 10 minutes to soften slightly. This way, you’ll have delicious, homemade Banana Fudge ready to impress without any last-minute fuss!
What to Serve with Banana Fudge?
When you treat yourself to sweet, creamy Banana Fudge, imagine the bliss of pairing it with delightful accompaniments that elevate your dessert experience.
-
Fresh Berries: Juicy strawberries or raspberries provide a tart contrast that enhances the fudge’s sweetness and adds a refreshing bite.
-
Whipped Cream: A dollop of lightly sweetened whipped cream brings airy lightness that complements the dense fudge while adding a touch of elegance.
-
Ice Cream: Creamy vanilla or banana ice cream creates a luscious pairing, making each bite a delightful blend of flavors and textures.
-
Chocolate Drizzle: A simple drizzle of melted chocolate adds an extra layer of richness, beautifully balancing the fruity flavor of the fudge.
-
Nutty Crumble: Toasted nuts or a mix of granola can add a crunchy element to the smooth fudge, giving your dessert an exciting texture.
-
Coffee: A warm cup of coffee or espresso enhances the flavors, providing a deliciously balanced contrast to the sweetness of the fudge.
Pairing sweet Banana Fudge with these delightful options not only rounds out the dessert experience but also transforms each moment into something deliciously special.
Chef's Helpful Tips
- When making Banana Fudge, ensure that your saucepan is heavy-bottomed to prevent the mixture from scorching while cooking.
- A common mistake is not stirring constantly when adding the sugar, as this can lead to grainy fudge.
- Use room temperature ingredients for better incorporation; this will help achieve a smooth and homogenous fudge mixture.
- Lastly, allow the fudge to fully chill in the refrigerator for at least four hours to ensure it sets properly and easily cuts into clean pieces.
Banana Fudge Recipe FAQs
How do I select ripe bananas for banana flavoring?
Absolutely! While you won’t use actual bananas in this Banana Fudge, if you’re making banana-flavored treats another time, look for bananas with a few brown spots. This indicates ripeness and a sweeter flavor, perfect for recipes like smoothies or banana bread.
How should I store leftover Banana Fudge?
Very! You can keep your delicious Banana Fudge in an airtight container in the refrigerator for up to 2 weeks. This method helps maintain its silky texture and rich taste, ensuring that every bite remains delightful.
Can I freeze Banana Fudge?
Absolutely! For extended enjoyment, wrap the Banana Fudge tightly in plastic wrap, then place it in a freezer-safe bag. It will last for up to 3 months in the freezer. Just don’t forget to label it with the date so you know when it’s time to indulge!
What’s the best way to thaw frozen Banana Fudge?
I often recommend transferring the frozen Banana Fudge to the fridge a day before you plan to serve it. This gradual thawing allows the fudge to maintain its texture while becoming ready to enjoy. If you’re in a hurry, you can leave it at room temperature for about an hour, but plan for longer for that perfect softness.
My fudge didn’t set properly. What could have gone wrong?
Don’t worry, this happens sometimes! If your fudge didn’t set as expected, chances are it wasn’t cooked long enough on the stove. Make sure to bring your mixture to a simmer and allow it to simmer for a full 3 minutes before removing it from heat. The science behind temperature is key for the fudge to hold its shape after chilling.
Is this recipe safe for those with nut allergies?
Very! The Banana Fudge itself is nut-free, making it a safe treat for those with nut allergies. However, always double-check your ingredients, especially the white baking chips and any crushed cookies or decorations you might use, as they could potentially contain traces of nuts. Always read labels for peace of mind!
Banana Fudge
Ingredients
Equipment
Method
- Prepare a 9×9-inch baking dish by lining it with parchment paper, ensuring it comes up on all sides. Lightly spray with nonstick cooking spray to prevent sticking, then set aside.
- In a small glass bowl, combine the banana flavoring and yellow food color gel. Stir well to blend the flavors and colors, then set it aside for later.
- In a heavy-bottomed saucepan, add the salted sweet cream butter, half and half, heavy cream, and clear vanilla flavoring. Heat over medium, stirring continuously until everything is melted and bubbly.
- Gradually add in the granulated sugar while stirring constantly. Bring the mixture to a simmer, which should take about 6 to 7 minutes. Allow it to simmer for another 3 minutes before removing from heat.
- Stir in the white baking chips, then cover the saucepan. Let it sit for 3 to 4 minutes so the chips can melt thoroughly.
- Once melted, add the marshmallow fluff to the saucepan, stirring until it’s fully incorporated and creamy.
- Pour in the banana flavor and yellow food gel mixture. Stir well until the fudge reaches a uniform color and the banana aroma fills your kitchen.
- Use a spatula to spread the fudge mixture evenly into the prepared baking dish. If desired, sprinkle crushed Nilla wafers on top for some added crunch, then cover with aluminum foil.
- Allow the fudge to sit at room temperature for 30 minutes before transferring to the refrigerator. Chill for at least four hours to achieve the perfect set.
- Once fully set, lift the fudge out using the parchment paper and cut into 25 delightful pieces. Keep refrigerated until you're ready to enjoy or share!


Leave a Comment